
Permissions are configured in the Permissions tab, in tenant settings or in application settings.
The tab has six areas:
- Templates — reusable bundles that generate rules automatically;
- Rules — the rules currently attached to resources;
- Access lists — named grants of Read, Modify, Delete and Create;
- User groups — the groups those grants are given to;
- Access map — a read-only view of what one user or group can reach;
- Maintenance — housekeeping actions.
Access map is always scoped to one application. It is present in application settings, and in tenant settings once you pick an application from the Application list at the top of the tab; the tenant-wide view shows the other five.
Work from the inside out: create the group, put it in an access list, then attach the access list to a resource with a rule.
Grant access to an application #
This is the first permission task in any new application, and the pattern it follows covers most of what you will ever need.
To grant a group access to an application:
- Open Application settings.
- Open Permissions.
- Open the Access lists tab.
- Select Create access list.
- Enter a Name such as
Sales team access. - Add the group in Subjects.
- Tick Read, and Modify if the group should be able to change data.
- Select Create.
- Open the Rules tab and select Create rule.
- Set Resource type to Application and select the application in Entity.
- Add the access list to Children NACLs.
- Select Create.
Putting the access list in the Children slot is what makes it cascade — but a cascade reaches one level only. An application’s Children grant covers its pages and its widgets, and stops there.
It does not reach datasets or objects, because a dataset’s parent is its connection, not the application. Granting access to the data therefore takes two more rules: one on the connection, whose Children grant covers its datasets, and one on each dataset, whose Children grant covers that dataset’s objects.
This is the single most common reason an application opens but every table in it is empty.
Add the same access list to Self NACLs as well so that the group can see the application itself on the homepage.
Restrict access to an application #
Access is restricted by not granting it, not by adding a rule that denies it.
An empty or narrow rule on a resource does not block anyone, because the parent’s cascade still applies to every user the direct rule does not cover. Adding a rule that names only the finance team to a page does not hide that page from everyone else if the application already grants them access.
To restrict access:
- remove the subject from the access lists that grant it;
- or narrow the access list to the group that should have access, rather than to All users;
- or grant access at a lower level instead of cascading it from the application.
Where only part of an application should be restricted, grant the broad access on the application’s Children slot and the narrow access on the specific page or dataset — but make sure the broad access does not already cover the restricted part.
Start by checking what is already granted. Out of the box, Auclio seeds one default template per resource type — Object excepted — and each of them applies Full access for all Users through both the Self and the Children slot. A resource that has never been permissioned deliberately is therefore open to everyone, and the first step in restricting it is to replace that grant on the generated rule rather than to add a second, narrower rule beside it.
Configure dataset access #
Datasets inherit from their connection, not from the application, so a dataset usually needs a rule of its own.
To grant access to a dataset and its objects:
- Open Permissions and the Rules tab.
- Select Create rule.
- Set Resource type to Dataset and select the dataset in Entity.
- Add an access list with Read to Self NACLs, so users can see the dataset exists.
- Add an access list to Children NACLs with the access users should have to the objects.
- Select Create.
The Children slot is the important one. Read there lets users see the objects. Modify there lets them edit objects. Create there lets them add new ones. Delete there lets them remove objects.
Create and Modify are independent. Create only takes effect when the access list is used in a rule’s Children slot, and it does not let anyone change objects that already exist, so a group that should both add and edit objects needs both flags. On the access map, a dataset whose Children grant includes Create shows Can add objects.
Datasets can also be permissioned from where you are already working. Open the dataset for editing and select Manage permissions. The panel shows whether the dataset has a rule of its own or is inheriting, and lets you edit both slots without leaving the dialog.
The same Manage permissions button appears on applications, pages, connections, objects, and most widgets.
Configure object access #
Object access has two levels, and you should reach for the second only when the first is not enough.
Dataset-level access is the baseline. Whatever the dataset’s Children slot grants applies to every object in it.
Object-level rules let individual objects differ. They are used when users should see only their own records, or only their department’s.
Writing a rule per object by hand is not practical, so object rules are generated by an object template. See Use object-based rules below.
To see the object rules that exist for a dataset, use the Access map tab: pick the user or group you are interested in, then select the object count on that dataset. The list shows each per-object rule and the access it grants, and an empty list means visibility comes entirely from the dataset cascade.
Create a permission rule #
To create a rule:
- Open Permissions and the Rules tab.
- Select Create rule.
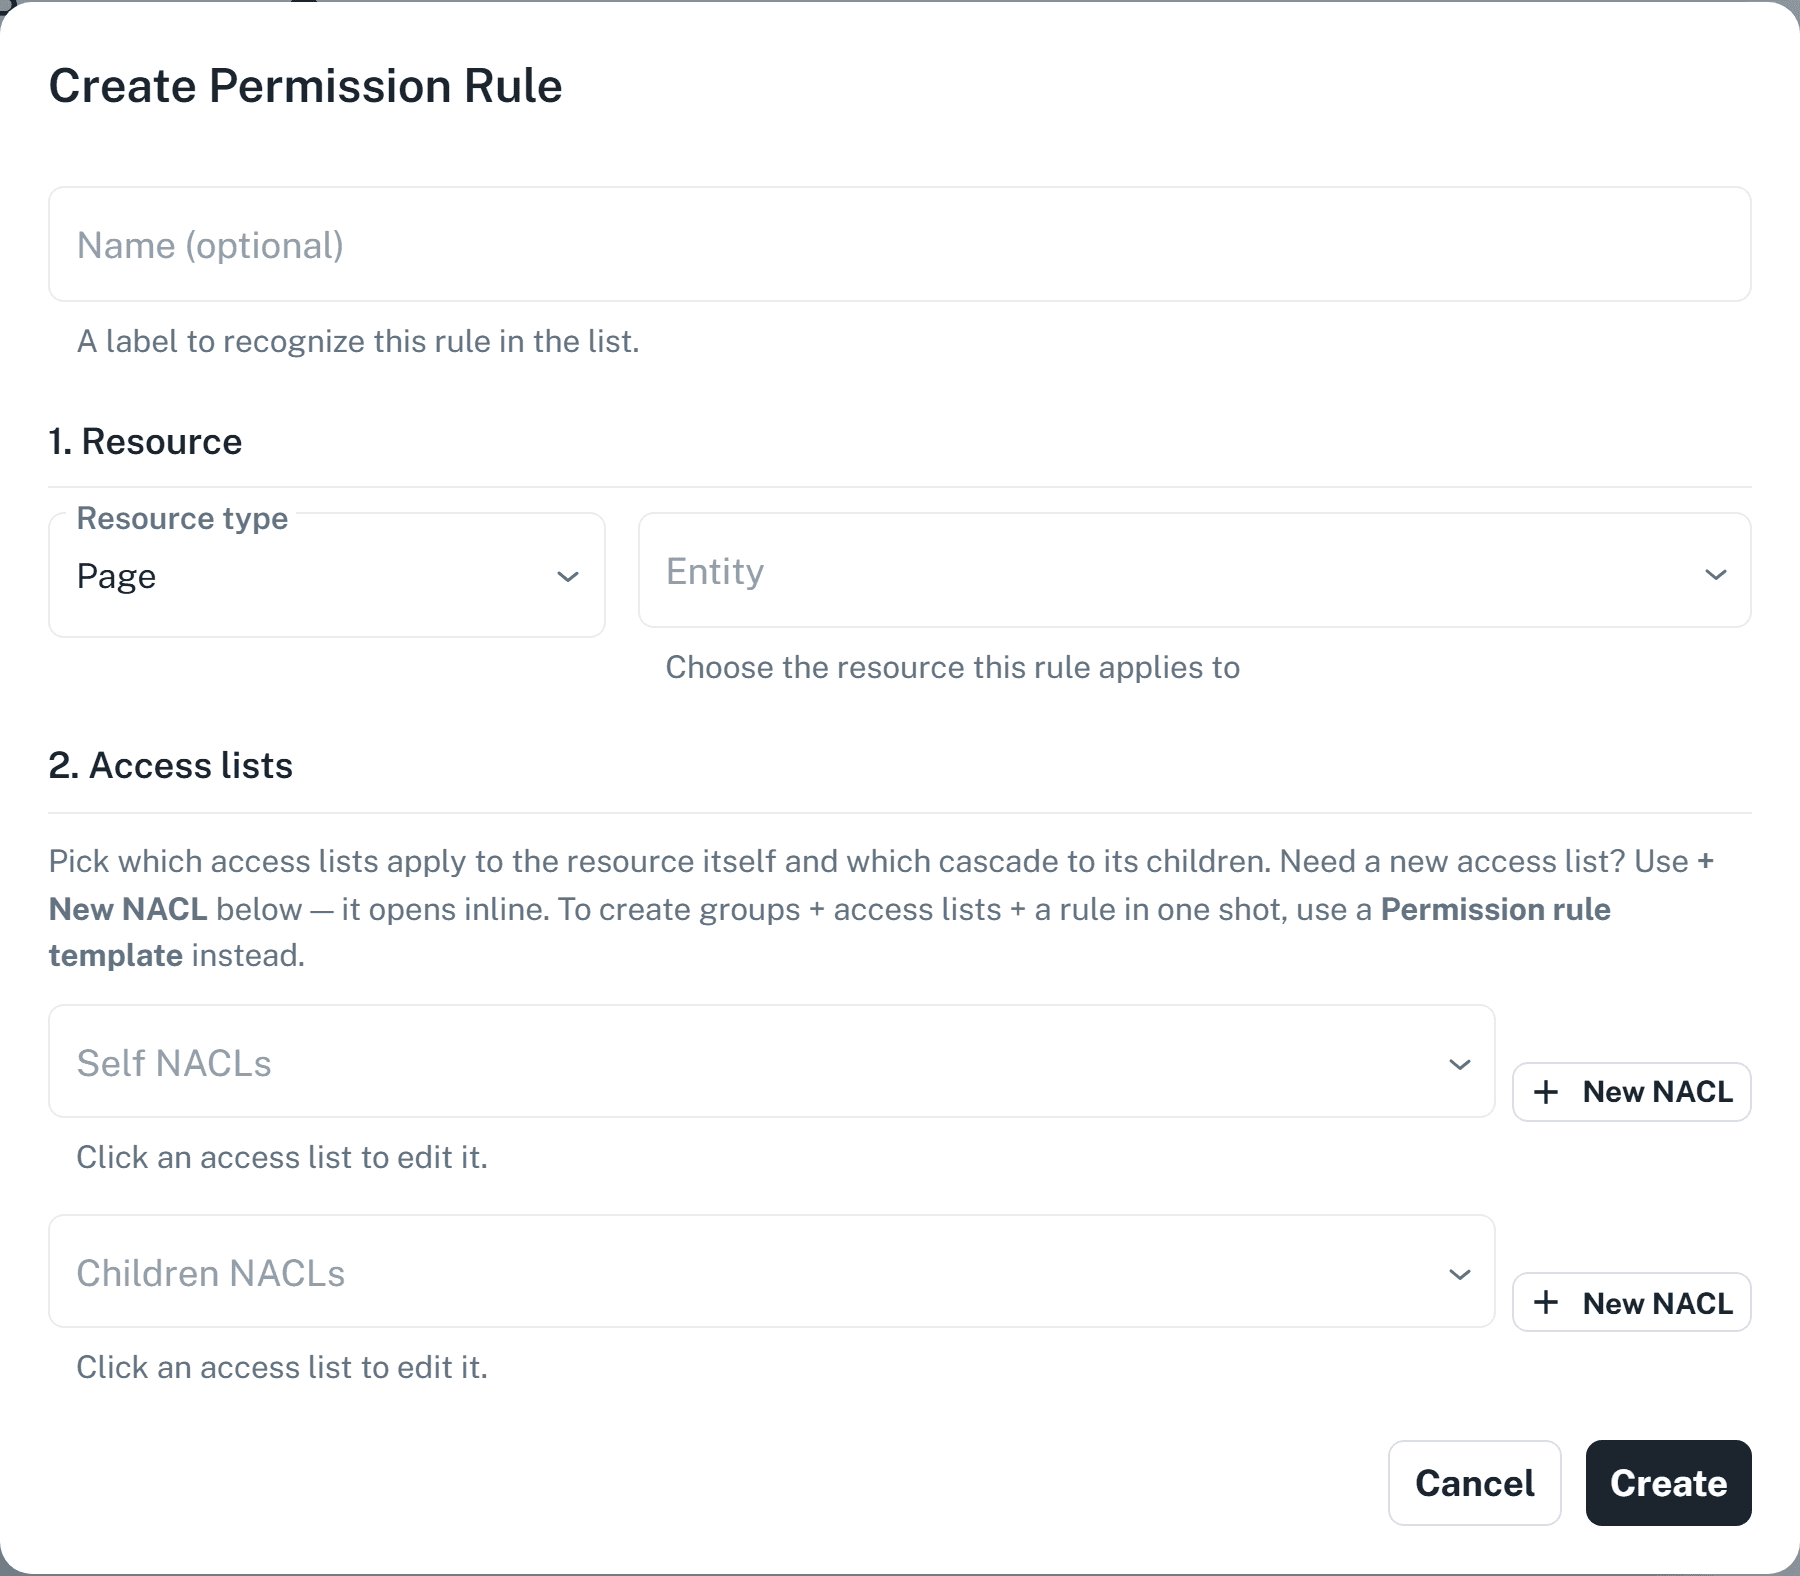
- Enter a Name (optional). A rule with a name is far easier to find later.
- Under 1. Resource, choose the Resource type and then the specific Entity.
- Under 2. Access lists, choose the access lists for Self NACLs and Children NACLs.
- Select Create.
If the access list you need does not exist yet, select New NACL to create it without leaving the dialog. Inside that dialog, New group creates a group the same way.
The resource type and entity cannot be changed after a rule has been created. Editing a rule lets you change its name and its access lists only, so create a new rule if you pointed at the wrong thing.
Resource types with a meaningful Children slot are Application, Connection, and Dataset. Pages, widgets, and objects are the bottom of the hierarchy, so a Children NACLs entry on one of them has nothing to cascade to and grants nobody anything. Some dialogs hide the field for those types and some still offer it, so do not take its presence as a sign that it will have an effect. Leave it empty for pages, widgets, and objects.
In tenant settings only application rules can be created. Rules on pages, widgets, connections, datasets, and objects must be created from inside the application that owns them.
Use permission rule templates #
A template is worth creating when the same rule should exist on every resource of a kind. Rather than remembering to add a rule to each new page, define the template once and let Auclio generate the rules.
To create a template:
- Open Permissions and the Templates tab.
- Select Create template.
- Enter a Template name. It becomes the prefix of the rules the template generates.
- Choose the Resource type and the Parent it applies under.
- Optionally select Define new group to add inline user groups.
- Optionally select Define new access list to add inline access lists.
- Choose which of those apply to Self and which to Children.
- Select Create.
A page template under an application generates a rule for every new page in that application. An object template under a dataset generates a rule for every new object in that dataset.
Existing resources are not covered automatically. Use Replay on the template’s menu to cover resources that already exist. Replay is a rebuild rather than a top-up: the rules the template generated before, and the groups and access lists generated with them, are deleted and produced again, and governed resources that have no rule get one. Rules you wrote by hand are left alone. Replay is unavailable on a template that has no parent, because such a template governs every resource of its type.
Add rule conditions #
Rules themselves do not have conditions. Conditions belong to object templates, where they decide which template a new object should use.
A dataset can have several object templates. When an object is created, Auclio evaluates each template’s condition against the object’s values and applies the one that matches.
To add a condition:
- Open the object template for editing.
- Open the 5. Condition & priority (optional) section. It appears only when the resource type is Object.
- Select Add condition group.
- Select Add condition.
- Choose the Property.
- Choose the Operator.
- Choose what the value is Compared to, and enter it.
The comparison can be against a Static value, against Another property of the same object, or against an Object in another dataset — one fixed object, identified by its dataset, its Object id, and the property to read.
The available operators are Equals, Not Equal, Contains, Does Not Contain, Greater Than, Greater Than Or Equal, Less Than, Less Than Or Equal, Like, Starts With, Ends With, Is Empty, and Is Not Empty. The last two take no value.
Combine multiple conditions #
Conditions are grouped, and the grouping decides how they combine.
Conditions inside a group are combined with AND or OR. Use AND when every condition must hold. The AND/OR control appears beside each condition after the first, but it sets one combinator for the whole group, so changing it on any row changes it for all of them.
Groups are combined with OR. Use a second group when an object should match either set of conditions.
For example, a template that should apply to high-value or overdue invoices needs two groups: one testing the amount, one testing the due date.
When more than one template’s condition matches, the template with the highest Priority wins; 0 marks a template as the fallback. A template with no condition at all is the fallback, used when nothing else matches. Give every dataset a fallback template, because Auclio seeds a default template for every resource type except Object — so there is nothing behind your object templates to catch what they miss, and an object no template matches gets no rule of its own and is governed entirely by the dataset’s Children cascade.
A condition that cannot be evaluated — a property that is missing, a referenced object that cannot be found, two values that cannot be compared — counts as not matching rather than failing, so one bad condition never stops a rule from being generated.
Conditions are evaluated when the object is created, and again when you replay the template. They are not re-evaluated automatically when an object’s values change.
Use user-based rules #
An access list can name individual users as subjects. This is the simplest kind of grant and the hardest to maintain.
Use it for genuinely individual cases: giving one person temporary access to one object, or granting an external reviewer access to a single page.
Avoid it for anything ongoing. A rule naming five people has to be found and edited whenever any of them changes role, and nothing tells you where those names appear.
Use group-based rules #
Naming a group instead of a person is the recommended approach for everything else.
To grant access to a group:
- Create or choose the group in the User groups tab.
- Create or open an access list.
- Add the group as a subject.
- Tick the flags the group should have: Read, Modify, Delete, and Create.
- Attach the access list to a resource with a rule.
From then on, access is managed by changing who is in the group, which is a single, visible place.
The built-in All users group is useful for things everybody should see, such as a company handbook page. The six built-in access lists — No access for all Users, Read access for all Users, Modify access for all Users, Delete access for all Users, Create access for all Users, and Full access for all Users — are ready to use.
Use object-based rules #
Object-based access is how you give people their own records without giving them everyone else’s.
The arrangement is a property-based group defined inside an object template. Defining it inside the template is what makes it per-object: Auclio creates one copy of the group for every object and resolves its filter against that object, so each generated rule names only that object’s owner. A group created separately in the User groups tab has no object to resolve against, so it would name every owner in the dataset and give all of them access to all of the records.
To set it up:
- Add a property to the dataset that records who the object belongs to, such as
Owner. - Open Permissions and the Templates tab, then select Create template.
- Enter a Template name, set Resource type to Object, and set Parent to the dataset.
- Select Define new group. Set its Type to Property-based, point Dataset at the same dataset, name the owner property in Property, and enter
$(_id)in Filter (object ids) so each copy is scoped to its own object. - Select Define new access list, add the inline group as its subject, and tick Read and Modify.
- Tick Self for that access list under 4. Apply to Self / Children.
- Select Create.
- Select Replay on the template’s menu to cover objects that already exist.
Each object then gets its own rule, granting access to whoever is named in its owner property. A user sees their own records and not others’.
Add a second object template with no condition as the fallback, so that objects no conditioned template matches still get a rule of their own.
Because conditions are not re-evaluated automatically, replay the templates after a bulk change of ownership.
Test permissions #
Permissions are the one part of an application you cannot check from your own account, because administrators bypass every rule.
To test permissions:
- Open Permissions and the Access map tab.
- Choose User or Group, then pick the person or group you want to check.
- Review what they can reach, and whether it comes directly or by inheritance.
- Sign in as, or ask, a user with that access.
- Confirm they can open the application and see the expected pages.
- Confirm that a table shows the objects they should see, and no others.
- Confirm they can create, edit, and delete only what they should.
- Repeat for each group with different access.
The access map is the fastest way to answer “what can this person reach, and why”. Its legend has three entries — Direct, Inherited, and Objects · own rules — distinguishing a resource’s own rule from a parent’s cascade, and marking the datasets where individual objects carry rules of their own.
Use the access map #
The access map draws, left to right, the user or group you pick, the groups they belong to, and the resources those groups reach in the current application. Selecting almost anything on it opens the matching editor, and the map refreshes when you close the editor, so you can fix a grant and see the result in place.
To open the map for someone:
- Open Permissions and the Access map tab.
- Choose User or Group.
- Pick the person in Select a user, or type part of a group’s name in Search groups and pick the group.
Tenant administrators and application administrators appear in the user list but cannot be picked, because permission rules do not apply to them.
When the subject is a group, its members are drawn to the left of it. Large groups show only the first members, followed by a +N more entry that reveals more when selected.
Switch between views #
The buttons beside the picker choose which resources are drawn:
- Data — connections, datasets, and objects;
- Visual — the application, its pages, and its widgets;
- All — both.
Data and Visual show how many resources the subject reaches in each. The map opens on Data, and remembers the last view you chose in your browser. If the subject reaches nothing in the current view, the map says so and suggests switching.
Groups that grant nothing in the current view are hidden. A line above the map says how many were hidden, and Show puts them back on the map.
Filter by dataset and object #
In an application with many datasets the full map is hard to read. The Dataset and Object filters narrow it to a single question.
Dataset offers every dataset in the application. The ones the subject reaches are listed under In this map, the rest under Other datasets. Picking one reduces the map to that dataset, the connection it is reached through, and the groups that grant them. If the subject cannot reach the dataset at all, the map says so instead, which is how you confirm that a dataset is hidden from someone. While a dataset is picked the map always shows the Data view.
Object becomes available once a dataset is picked. Type part of an object’s name, pick the object, and the map adds it under the dataset with the access the subject has to that object.
Select Clear filters to return to the full map.
Read the resource cards #
Each resource on the map is a card showing what the subject can do there:
- Rule — the resource has a permission rule of its own;
- Can … — the access the subject has to the resource itself, filled in for direct access and outlined for inherited access;
- → children … — what the resource cascades to everything under it;
- No access — neither the resource’s own rule nor its parent’s cascade grants anything;
- Can add objects — on a dataset, the Children grant includes Create.
The letters R, M, D, and C stand for Read, Modify, Delete, and Create. Only flags that have an effect are shown: Modify and Delete only on objects, and Modify, Delete, and Create only in a dataset’s → children chip. Everything else shows Read alone, because only administrators change applications, pages, widgets, connections, and datasets. A dataset card also says which of its objects the subject sees: All objects, No objects, a number followed by objects · own rules when only objects with their own rules are visible, or All except a number when some objects are carved out by their own rules.
Selecting a card opens Manage permissions for that resource. Selecting the object chip on a dataset card opens Object rules for that dataset instead, listing the per-object rules that apply to the subject. Selecting a group opens the group for editing; the built-in All users group cannot be edited.
Review one user’s access #
Selecting a user on the map — the subject itself, or a member of a group — opens a dialog with everything that user can do in the application.
The top of the dialog shows the user’s id, where the account comes from (Local account or the name of the identity provider), and chips for Tenant admin, Application admin, or Application creator. For an administrator a warning explains that permission rules do not apply, so the grants listed below exist but are not what gives them access.
The dialog has three sections:
- Can reach — the resources the user reaches, grouped into Applications, Pages, Widgets, Connections, Datasets, and Objects. Each entry shows the user’s access, what it cascades under Children, and for a dataset which objects the user sees, and says whether the access is inherited and through which group. Select a name to open its permissions, or a dataset’s object chip to open that user’s object rules. A Search box appears when the list is long.
- Groups — every group the user belongs to. Select a group to edit it.
- Access lists — the access lists that name the user, with their flags, the group they reach the user through, and how many rules use them in this application. Select a name to edit the access list. Access lists that name the user but are not used by any rule here are hidden behind a Show link.
Select Show on map to redraw the map for that user. The button is not offered for the user already on the map, or for administrators.
Troubleshoot missing access #
If a user cannot see something they should, check in this order.
Check that:
- the user has an Auclio role, and it is not Readonly User when they need to edit;
- the user is in the group the access list names;
- the access list has the flags you expect;
- the access list is attached to a rule, and the rule points at the right resource;
- the grant is in the correct slot — Children for things inside the resource, Self for the resource itself;
- the dataset has its own rule, since datasets inherit from the connection rather than from the application;
- a couple of minutes have passed, if membership comes from a property-based group and you changed the data rather than the group, because that is reconciled by a background check.
If a user can see a page but the table on it is empty, the page permission is right and the dataset permission is missing. Grant Read on the dataset’s Children slot.
If a user can see some objects and not others, object-level rules are in play. Check that the object template’s condition matches, and replay the template.
If a user can see something they should not, remember that a direct rule is not a deny. Find every access list that grants them access, including through a cascade from the application, and remove the grant there.
Changes to rules and access lists take effect immediately, so if one of those appears not to have applied, look for a second grant rather than for a delay. If a membership change has not taken effect after a few minutes, open the Maintenance tab and use Clear cache or Refresh access under Group membership cache.
